Contents
Countering Zed: The Master of Shadows
[ultimate_author_box]
“The unseen blade is the deadliest.”
Zed has been the favored assassin of choice for the majority of the League of Legends metagame – to no surprise at all!
Since his addition to the champion roster by the end of the 2nd season, Zed has seen prominence in Solo Queue to the highest-level of Competitive Play. With his high skill ceiling, unrivaled outplay potential, and undeniable flashiness, the Master of Shadows has been the poster champ for many of the game’s decorated pros, such as Bjergsen, xPeke, and the Unkillable Demon King, Faker himself. Even producing one of League’s most-famed outplays in its history when SKT Faker 1v1’d KT Ryu in the OGN Champions Season 3 Summer Finals.
Now, although Zed may be a sinister counterpart in the mid lane, that doesn’t mean he’s unstoppable. Let’s breakdown the shadow assassin’s core gameplay and lay down the strategy needed to deny Zed of his success.
KIT:
 Preface
 Preface
Zed is an energy-based assassin, which means that he can repeatedly spam his abilities without worrying about losing mana. The Master of Shadows utilizes his kit to deceive and outplay his opponents, turning the worst of situations into his favor at a moment’s notice.
Passive: Contempt for the Weak
 Passive: Contempt for the Weak
Zed’s passive, Contempt for the Weak, is his core ability to execute his enemies. Whenever an enemy is at low health, he is able to quickly finish opponents off given the % maximum health damage applied to his basic attack. Thanks to his passive, Zed is able to rush in, swiftly execute his foe, then jump out of harm’s way. Be wary when you are hovering below half of your hitpoints, as with Zed’s kit, he can easily eliminate you from a distance.
Q: Razor Shuriken
 Q: Razor Shuriken
Zed’s bread and butter ability, Razor Shuriken. A mid-range projectile that deals physical damage to all enemies it passes through. With his shurikens, Zed can safely farm during the laning phase and whittle enemies down through the ability’s extended range from Living Shadow. Skilled Zed players are masters of landing the skillshot from the most peculiar angles, even possibly landing a triple-shuriken combo when used with shadow + ultimate resulting in puns of damage. Although, even a double-shuriken combo coupled with his ultimate is enough to take out the toughest of carries.
W: Living Shadow
 W: Living Shadow
Living Shadow serves as Zed’s primary mobility ability that can simultaneously serve as a means to stack damage to his combo. With Living Shadow, Zed produces a stationary shadow that dashes forward which he can swap places with and is able to mimic his damage abilities in Razor Shuriken and Shadow Slash. Given a target range of 650 (half more the distance of a Flash), Zed can use Living Shadow to deal further damage, retreat from an already-accomplished assassination, get away from unfavorable situations, or even dodge skillshots.
Moreover, whenever Zed lands abilities on the same target as the shadow does, he restores a flat amount of energy to be able to continue his pursuit of his upcoming victim.
In order to avoid these instances of damage, you must be aware of how Zed utilizes his shadow. Staying out of range or potentially anticipating where he’s going to throw his shuriken through the shadow’s extended range.
E: Shadow Slash
 E: Shadow Slash
Shadow Slash, a close range area-of-effect slash, is Zed’s sole melee ability that pads his damage in face-to-face fight and assists Zed’s waveclear ability. When used alongside his Living Shadow, Zed applies a 1.5s slow that enables him to precisely land his Razor Shurikens and catch up to reach his opponents to apply a proc of Contempt for the Weak. It is noteworthy to remember that for each Shadow Slash that hits an enemy champion, Living Shadow’s cooldown is reduced by 2 seconds – effectively aiding in Zed’s escape and damage ability when Living Shadow gets back up for use.
R: Death Mark
 R: Death Mark
The iconic, Death Mark. One of the highest-tier 1v1 ultimates in the game’s history.
By casting Death Mark, Zed enters a state of untargetability for three-quarters of a second and thereafter, appears at the back of the targeted champion, gains the ability to walk through units, spawns a Living Shadow that remains for six seconds, and applies a mark that stores a part of all primary-type damage Zed deals to his target, which detonates at the end of three seconds to deal enormous damage.
Sounds tricky right? That’s because it is.
Death Mark offers the Master of Shadows a flexible timeframe wherein he can cast pace his damage output in the timing he prefers, striking anytime favorable during the mark’s duration. Alongside the damage he’s already dealt with his primary abilities, Death Mark’s mark detonation is the nail in the coffin to secure Zed’s execution. For added outplay potential, Zed can utilize his ultimate to dodge incoming abilities such as Fizz’s Chum the Waters, Syndra’s Unleashed Power, and incoming crowd control or skillshots to buy that sliver of time needed to pull off the assassination.
To add to that, Zed can choose to blink back to the cast location of his Death Mark, swapping places with the Living Shadow he casted during the first cast of Death Mark, providing Zed with newfound opportunities to escape and confuse his enemies.
Champion Counters:
Zed predominantly counters immobile control-mages such as Syndra, Ryze, Taliyah, Azir, Zoe, and the like, with the special inclusion of Kassadin, as the Void Walker’s abilities focus on negating Ability Power damage and with no means to counter Zed’s kit. To counter Zed, on the other hand, champions with innate sustain, invulnerability, and durability such as Vladimir, Kayle, and Malzahar thrive against the Shadow Master, as these champion picks have ways to negate and sustain through Zed’s burst-type damage.
Summoner Spells:
Coming into the laning phase, the majority of Zeds will be running the quintessential Flash and Ignite to boost their assassination ability. That said, it’s crucial to come into the matchup with Flash and either Exhaust, Barrier, Heal, or Teleport to sustain through Zed’s onslaught later on in the game. Depending on the circumstance, it can be said that Exhaust is more effective in shutting down Zed all-throughout the game, significantly reducing his damage output during the crucial moments when his Death Mark procs. Heal is prioritized over Barrier because although Ignite reduces the healing effects brought about by Heal, Barrier will only negate two-fifths of Ignite’s damage while Heal will be able to negate more of Ignite’s damage all throughout the game (77.1% by Level 1 to 50.5% by Level 18) whilst giving a brief movement speed buff. And also, health gained through Heal stays for longer compared to Barrier’s 2-second duration.
However, if you want to negate more of Zed’s damage later in the game, especially if Zed does not bring Ignite, Barrier is a considerable option as it will cover around 115-455 damage based on level, compared to Heal’s 90-345 heal value.
Runes:
In building defensively towards countering Zed, a few noteworthy runes come to mind.
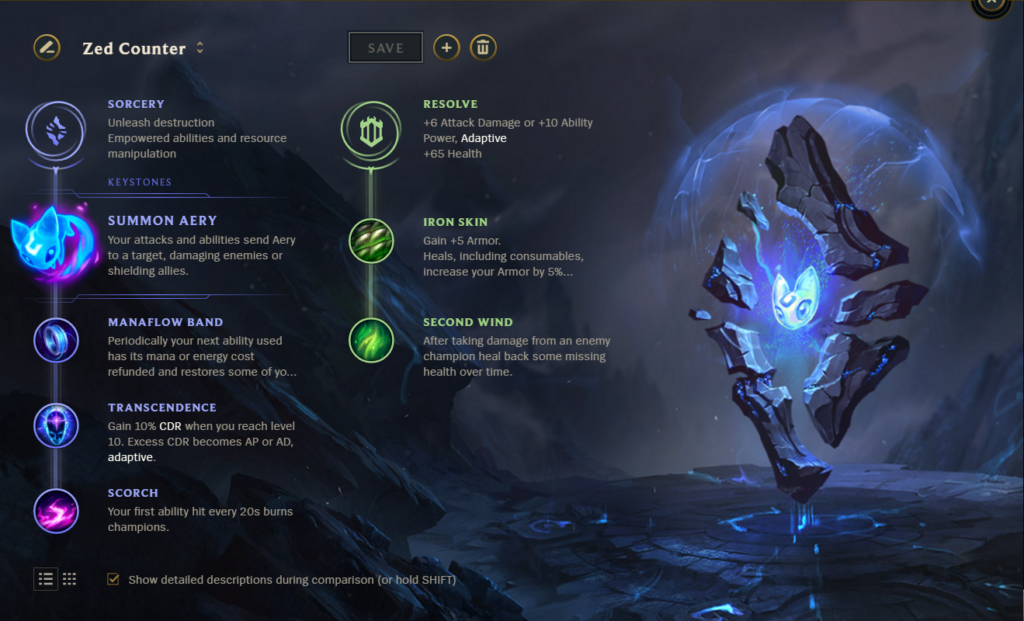
If you’re playing a Sorcery primary-tree mid laner, for your secondary tree, choose Resolve. Given the recent health bonus alongside the combat stats the Resolve tree provides, Iron Skin (provides +5 armor and enhances heals and shields and provides increased armor), Second Wind (mini-doran’s shield), and Conditioning (provides increased resistances after 10 minutes in-game) are viable options to consider when wanting to mitigate Zed’s effective damage throughout the laning phase.
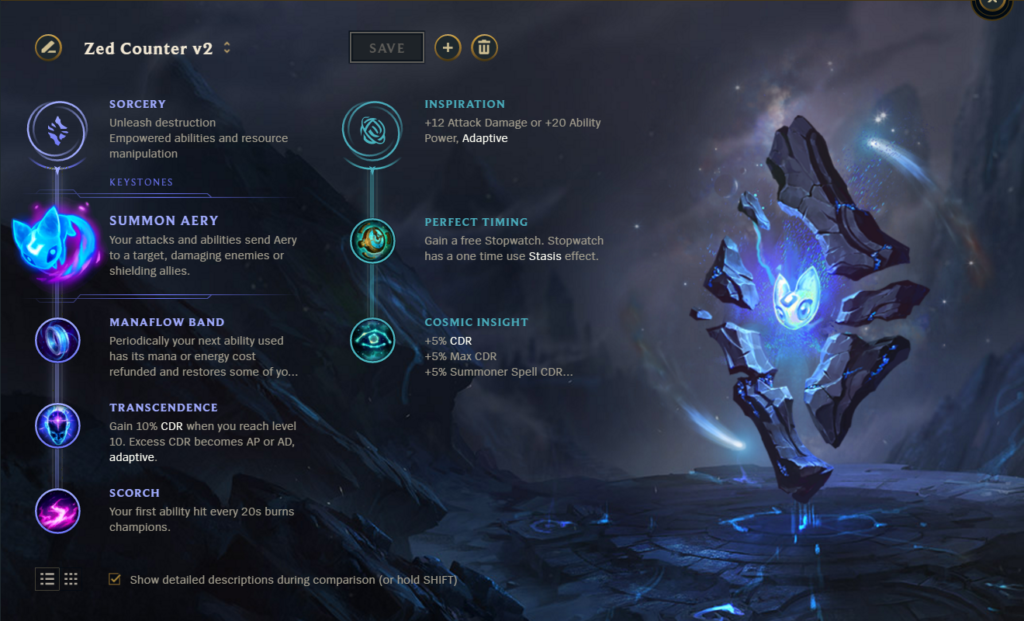
Special mention, however, goes to the Inspiration tree’s Perfect Timing, which gives you a free Zhonya’s-like stasis item in Stopwatch by 6 minutes and reduces the cooldown of Guardian Angel or Zhonya’s Hourglass by 15%. With Perfect Timing, around the time mid laners reach six minutes into the game, you’ll have a defensive tool against Zed’s ultimate to negate its damage in the earlier stages of the game. Biscuit Delivery also seems like a viable alternative for those who want sustain against Zed in the early game, as you are given Total Biscuits of Everlasting (which restore a significant amount of missing health and mana) every three minutes. Since Perfect Timing and Biscuit Delivery are on the same branch, you could opt for additional gold-effective stats in Magical Footwear, Future’s Market, Cosmic Insight, etc. which are additional perks when considering the value you get from either of the two runes.
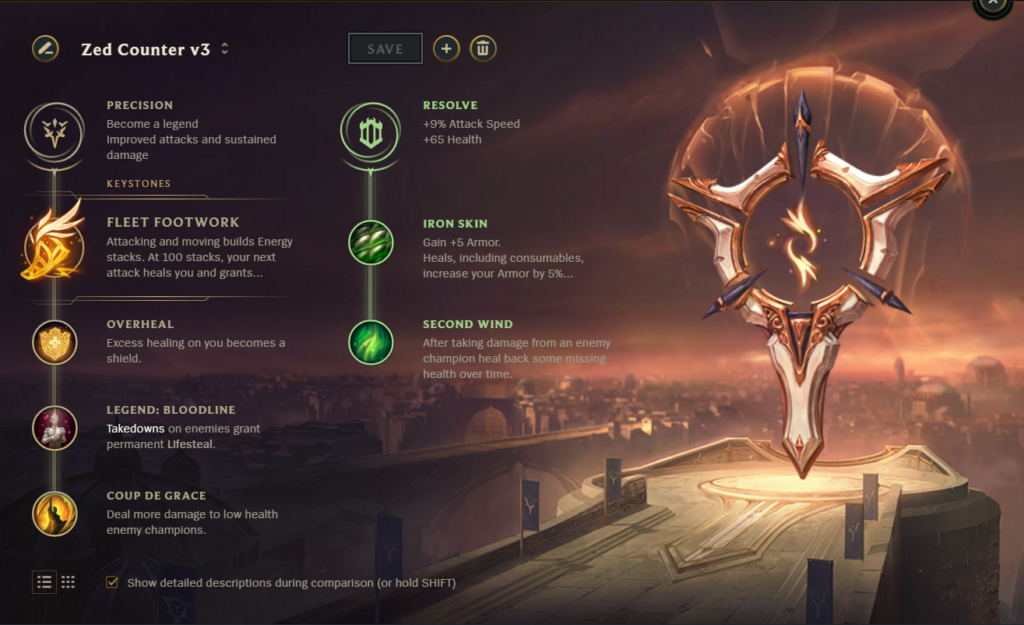
If you’re playing a Precision primary-tree mid laner, Fleet Footwork, Overheal, and Legend: Bloodline all are viable options for increasing your sustainability throughout the laning phase.
In Lane:
Throughout the laning phase, you have to be wary of a few key factors, (1) Zed’s Living Shadow position and cooldown, (2) Summoner Spell cooldowns, (3) Kill pressure, and (4) Jungler assistance.
In order to beat Zed, you must be able to effectively farm while dodging his abilities in Razor Shuriken and/or in conjunction with Living Shadow and Shadow Slash. Zed’s Razor Shurikens deal more damage when it hits the first target, therefore, it is important to stand behind ally minions if you are not able to dodge the skillshot completely.
When Zed uses his Living Shadow, he has a number of choices at his disposal, it’s either he’s there to kill you alone or alongside his Jungler or he wants to poke you with Q and E. Be wary of your own healthbar when he does this, if you are nearing ~half your hitpoints, you have to watch out for any all-in opportunities as he can finish you off if you take his abilities to the face with Ignite and Contempt for the Weak.
Make sure to always have vision around your side-bushes, as Junglers with potent crowd control or kill pressure such as Elise, Lee Sin, Jarvan IV, etc. will want to snowball the Zed ahead in favor of his team. If you cannot call for your own Jungler for assistance, remember to respect the enemy laner’s damage and all-in potential. If you are hovering over ~200 health with no anticipation of his coming moves, you might be surprised he flash autoattacks you to proc Contempt for the Weak and leave you for dead with Ignite.
To be able to turn the tides against Zed, you must take advantage of his Energy system and ability cooldowns, as that is where Zed gets the majority of his strength. Poor Zed players will ineffectively manage their energy, spamming abilities without leaving energy in reserve to pull out of unfavorable situations. Unskilled Zed players will pointlessly use their Living Shadow and combo whenever they can, take the time to analyze the enemy’s movements and trade patterns, then strike when he is most vulnerable (with abilities on cooldown).
Since Zed is melee, take advantage of the opening created when he basic attacks a minion to farm – that’s because, in that moment, the opponent will be unable to react to your advances.
However, there will be crafty Zeds that will be able to take advantage of your knowledge on these weaknesses. It is absolutely vital that you think on your feet and adapt to the moments on-the-fly, as skilled and creative Zed players do. Zed’s kit can be used defensively while being on the offensive side of the trade, even when a Zed is running away from you, they will try to turn it around through bursting you down with a quick double-shuriken, shadow slash powered, living shadow.
Zed has the potential to tower dive and strike you down from half-across the map as well. In these potential situations, you have to anticipate the coming attack and either respect their kill pressure and recall or prepare for an ensuing 1v1 duel.
Items:
As a mage, stacking another Doran’s ring or upgrading a Refillable Potion buy into a Corrupting Potion would give enough sustain throughout the first few minutes of the game (especially if you brought Teleport).
Additionally, for extra durability, you can opt for a first-item Seeker’s Armguard or Stopwatch to build into Zhonya’s Hourglass/Guardian Angel later on. If the shadow ninja’s lethality proves to be too much, building Ninja Tabi could also help mitigate a significant amount of armor penetration present in Zed’s damage arsenal.
In Teamfights:
In order to effectively counter Zed, you must know how his abilities function and how these abilities interact and complement one another.
Zed thrives on chaos. In teamfights, Zed’s objective will be to either eliminate priority carries on-sight or deal as much area-of-effect damage with his Living Shadow staple. To prevent that, you and your team must assess who is Zed’s pick priority for each teamfight (which could possibly be the enchanter Support, marksman, or mage). Then, you must devise a strategy to expect the Zed’s angle of attack and peel back for the said carries when the moment arises. Prepare your Exhausts, key crowd control to lock the assassin down, and cut him down when he comes in unprepared for your team’s in-sync teamwork.
In the mid-game and late-game, it is recommended to avoid 1v1 situations with Zed, unless you have a teammate that can handle the assassin head-on. As an assassin, Zed has a harder time accomplishing his role when teams start banding and grouping together.
And of course, vision control is crucial to avoid pick-offs that Zed excels at given the slightest of opportunities. Having optimal vision control will remove potential blindspots to your team’s teamfight formation and will prove it harder for the Shadow Master to go in and out unnoticed.
Remember to wait for crucial Summoner Spells in key teamfights, as they may be the separating factor between a carry living or dying by the blade.